Creating a custom case#
By sourcing the provided environment file
source jsc.2024_Intel.sh
the necessary compilations in this repository can be performed consistently. It also contains the export of necessary paths for netCDF. If you are on a JSC machine, it will be very useful to set this data path:
export CSMDATA="/p/largedata2/detectdata/CentralDB/projects/z04"
If not, you’ll have to get the relevant raw data at the respective steps and either set $CSMDATA to a different path or replace it with your respective local directory.
To create all static files needed to run eCLM, you first need to create a gridfile, then mapping and domain files and only then you can create surface and forcing files.
All-in-one wrapper script#
For rectilinear, curvilinear, and icosahedral grids, the four steps of
the static file generator (grid file, mapping files, domain file,
surface file) can be run in one go with the wrapper script
run_static_file_generator.sh from the repository root. The
individual step-by-step pages that follow are useful if you need more
control over a single step or want to understand the workflow in
detail.
Rectilinear grid#
Provide the bounding box and resolution directly on the command line.
Example: Political NRW
./run_static_file_generator.sh \
    --grid 300x300_DE-NRW \
    --slat 50.3 --nlat 52.5 \
    --wlon 5.9 --elon 9.5 \
    --nx 300 --ny 300 \
    --account myproject --partition mem192
Example: ICOS site DE-RuS (single-point)
./run_static_file_generator.sh \
    --grid DE-RuS \
    --slat 50.860906 --nlat 50.870906 \
    --wlon 6.4421445 --elon 6.4521445 \
    --nx 1 --ny 1 \
    --account myproject --partition batch
Example: EUR-11. Note: Continental scale simulations should not use rectilinear grids. This is just for reference.
./run_static_file_generator.sh \
    --grid EUR-11rect \
    --slat 21.0 --nlat 72.0 \
    --wlon 330.0 --elon 62.0 \
    --nx 424 --ny 412 \
    --account myproject --partition mem192
Curvilinear grid#
Provide a netCDF file that contains 2D lat/lon center coordinates.
SCRIP generation uses NCL via a Conda environment named
NCL_environment (see Creation of grid file
for installation instructions).
./run_static_file_generator.sh \
    --grid EUR-11 \
    --grid-type curv \
    --gridfile $CSMDATA/detect_grid_specs/grids/EUR-11_444x432_grid_inclbrz13gp_v2.nc \
    --account myproject --partition mem192
If your file uses different variable names for the coordinates, add
--latvar and --lonvar.
Icosahedral grid#
Provide an ICON grid file (e.g. obtained from zonda.ethz.ch):
./run_static_file_generator.sh \
    --grid EUR-R13B05 \
    --grid-type icos \
    --gridfile $CSMDATA/detect_grid_specs/grids/EUR-R13B05_199920_grid_inclbrz_v2.nc \
    --account myproject --partition mem192
Prerequisites and output#
CSMDATAmust be set (see above).The mapping step (step 2) requires SLURM (
--account,--partition).For the curvilinear case, a Conda environment
NCL_environmentwith NCL must be available.The script produces a SCRIP grid file in
mkmapgrids/, mapping files inmkmapdata/, domain files ingen_domain_files/, and a surface file inmksurfdata/.
For this the grid has to be properly defined in one of the following formats:
SCRIP
ESMF-Mesh
CF-convention-file
SCRIP is a very old format not maintained anymore but is still the most effective solution. ESMF is able to basically handle any netCDF file that follows the CF-conventions version 1.6 and includes lat/lon values and corners. This means that ESMF mesh files are also able to describe unstructured grids.
Hint: Once a static file generation is started, it is best practice to not anymore copy or move the repository. This ensures tracability of absolute paths, e.g. absolute paths of map files saved in the domain file as netCDF attributes.
Creating a custom case (old) - Click to expand
This workflow will guide you through creating your own input datasets at a resolution of your choice for eCLM simulations.
Throughout this process, you will use a range of different scripts to create the necessary files.
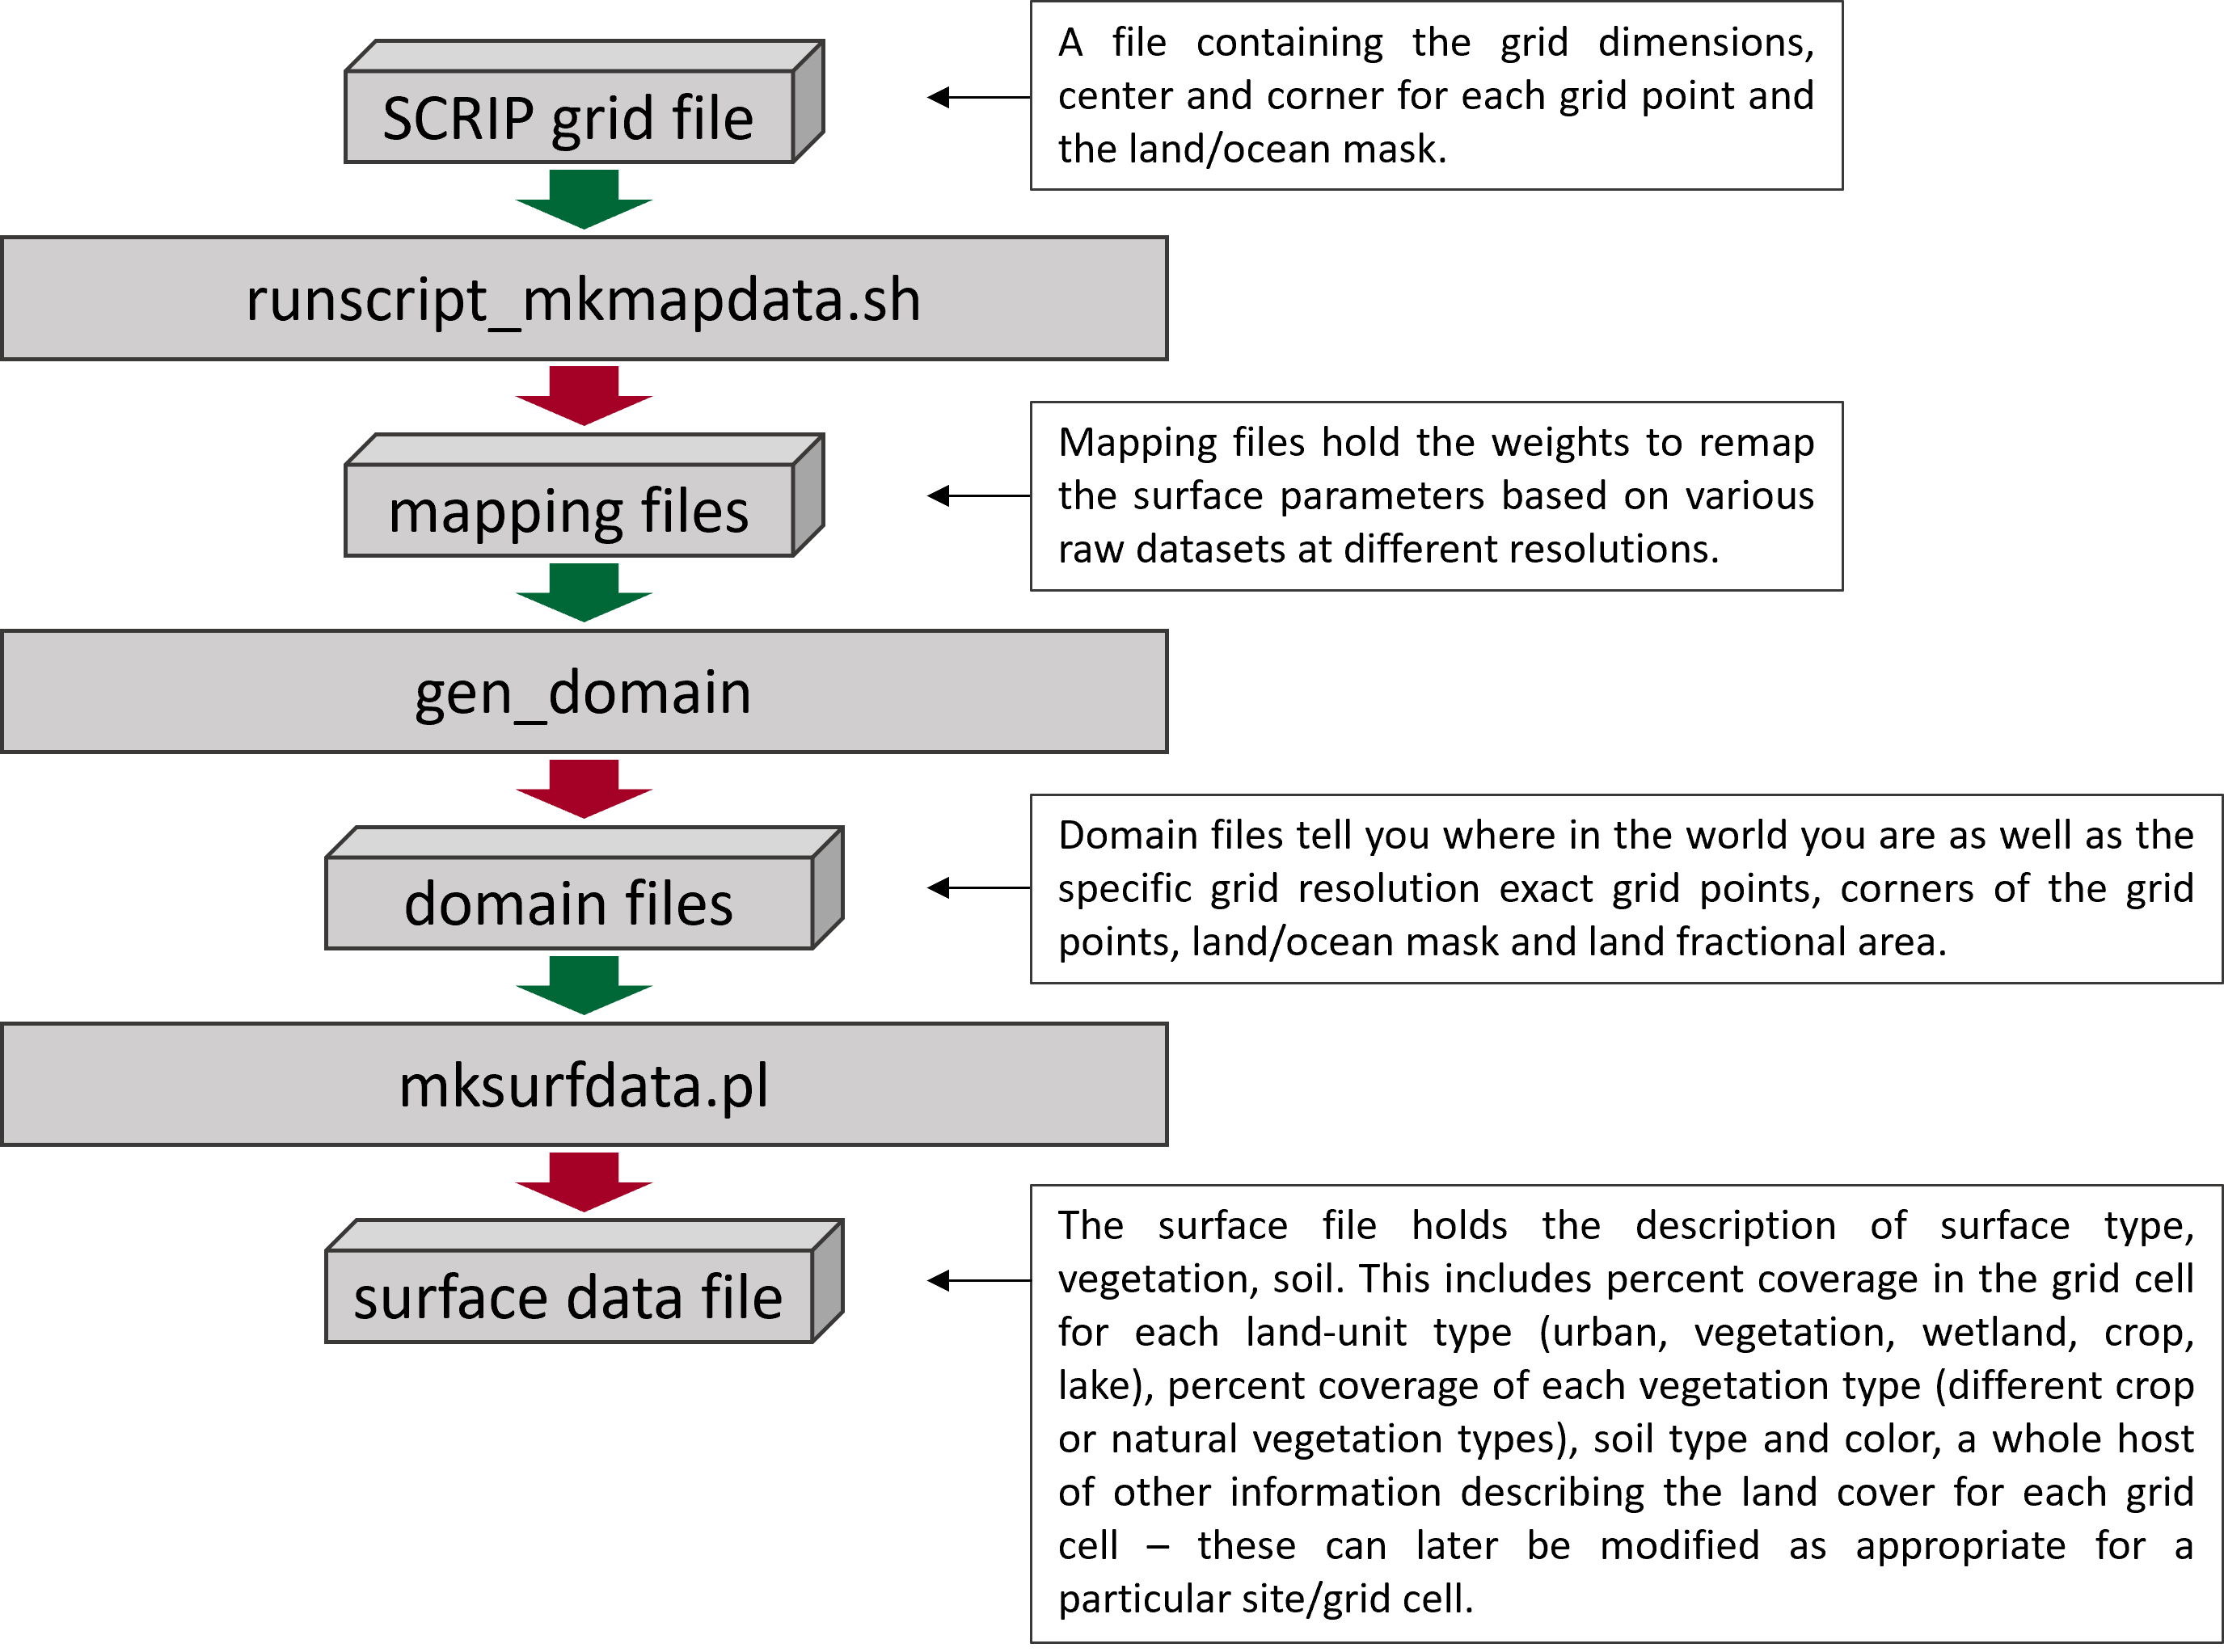
Fig. 1 Overview of the work flow for the creation of custom surface datasets adapted from the CLM5.0 User’s Guide.#
This workflow is based on the following Github repository that contains all the necessary tools: HPSCTerrSys/eCLM_static_file_workflow. It follows the official CLM-workflow but makes a few adaptations. The basis is the clm5.0 release but there might be newer developments in the CTSM and CIME Github repositories.
To get started, log into the JSC system and clone the repository for instance into your folder in project1 that you created during the build of eCLM.
cd /p/project1/projectID/user1 # replace projectID with your compute project and user1 with your username

git clone https://github.com/HPSCTerrSys/eCLM_static_file_workflow.git
Sourcing the environment file that is contained in the repository will load all the required software modules.
cd eCLM_static_file_workflow/
source jsc.2023_Intel.sh
You are now ready to start with the workflow.