5. Maintenance
At its core this documentation is written in simple markdown files, which are easy to write and quite portable, but the downside is that the resulting collection of files is not easy for the user to browse. To solve this problem, sphinx is used to render a nice looking and searchable HTML documentation based on the markdown files, which can be opened in any web browser. To enable direct access for every user, the rendered documentation is then published with GitHub-Pages. Furthermore, the rendering and deployment process is automated using GitHub workflows to make it as easy as possible to update this documentation.
The following sections describe all the steps and settings required to set up, understand, and maintain the above process chain on GitHub.
5.1. Rendering with sphinx
Sphinx is a document generator written in Python that aims to render intelligent documentation in various output formats based on reStructuredText and markdown files.
The backbone of Sphinx is a configure file (conf.py) that defines the features of the final documentation and an index file (index.rst) that forms the entry point of the final documentation, linking all involved markdown or reStructuredText files used for rendering.
For details information on how to get started see the official GettingStarted website.
5.1.1. conf.py
Setting up the configure file is quite straightforward and well explained in the official documentation. Three settings are highlighted below, which are mandatory for the current documentation:
Extensions:
Below extensions for sphinx are used and needed to render the documentation:
extensions = [
        'sphinx.ext.autodoc',
        'sphinx.ext.viewcode',
        'sphinx_rtd_theme',
        'sphinx.ext.napoleon',
        'sphinx.ext.mathjax',
        'sphinx_copybutton',
        'myst_parser'
        ]
MyST parser:
MyST is a python parser for the markdown language available as an extension for sphinx. Further MyST can be used to generate link anchors, enabling to easily internally link different documentation pages.
Using MyST requires the following setting in conf.py:
myst_heading_anchors = 4

myst_enable_extensions = [
    "amsmath",                  # LaTeX equations
    "dollarmath",               # Inline LaTex
]
To use a link anchors, first scan the related file for available anchors
myst-anchors -l auxiliaryscripts.md
>> <h1 id="auxiliary-scripts"></h1>
>> <h2 id="aux_migratefromscratchsh"></h2>
>> <h2 id="aux_untarmanytarssh"></h2>
>> <h2 id="aux_restagetapesh"></h2>
>> <h2 id="aux_gzipsh-and-aux_gunzipsh"></h2>
>> <h2 id="aux_sha512sumsh"></h2>
than use a found anchor similar as normal links in markdown:
[aux_UnTarManyTars.sh](REL/PATH/TO/auxiliaryscripts.md#aux_untarmanytarssh)
Edit on GitHub button:
By default, sphinx provides a View page source button in the top right corner of each page of the documentation. Clicking on this button will display the unrendered, raw content of that page. This functionality is not very helpful, but can easily be adapted into an Edit on GitHub button, which will take you directly to the corresponding file in the repository to quickly apply changes. How to use this feature is described in detail in the How to contribute section. To enable this functionality, the following settings are required in conf.py:
html_context = {
    "display_github": True, # Integrate GitHub
    "github_user": "HPSCTerrSys", # Username
    "github_repo": "TSMP1_WorkflowEngine", # Repo name
    "github_version": "main", # Version
    "conf_py_path": "/doc/", # Path in the checkout to the docs root
}
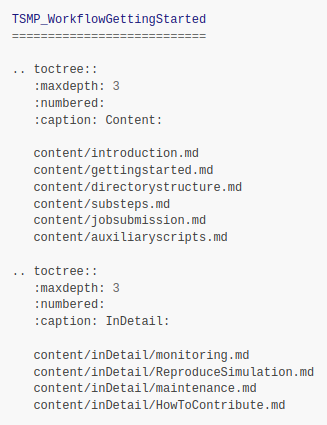
5.1.2. index.rst
The index.rst file forms the structure of the documentation and acts as a table of contents, determining which file to include in the rendering process. The structure of the index.rst file thereby is quite simple, just a heading and a sequence of toctrees (imagine as chapters), which in turn consist of a list of involved files to render.
Below is an example of an index.rst file with a screenshot of the generated table of contents:
To be Noted:
The actual text in the rendered TOC (such as1. Introductionor1. Simulation Monitoring) is taken from the headline of the associated markdown file, even if the file names are identical by chance!
TSMP1_WorkflowEngine
===========================

.. toctree::
   :maxdepth: 3
   :numbered:
   :caption: Content:

   content/introduction.md
   content/gettingstarted.md
   content/directorystructure.md
   content/substeps.md
   content/jobsubmission.md
   content/auxiliaryscripts.md

.. toctree::
   :maxdepth: 3
   :numbered:
   :caption: InDetail:

   content/inDetail/monitoring.md
   content/inDetail/ReproduceSimulation.md
   content/inDetail/maintenance.md
   content/inDetail/HowToContribute.md
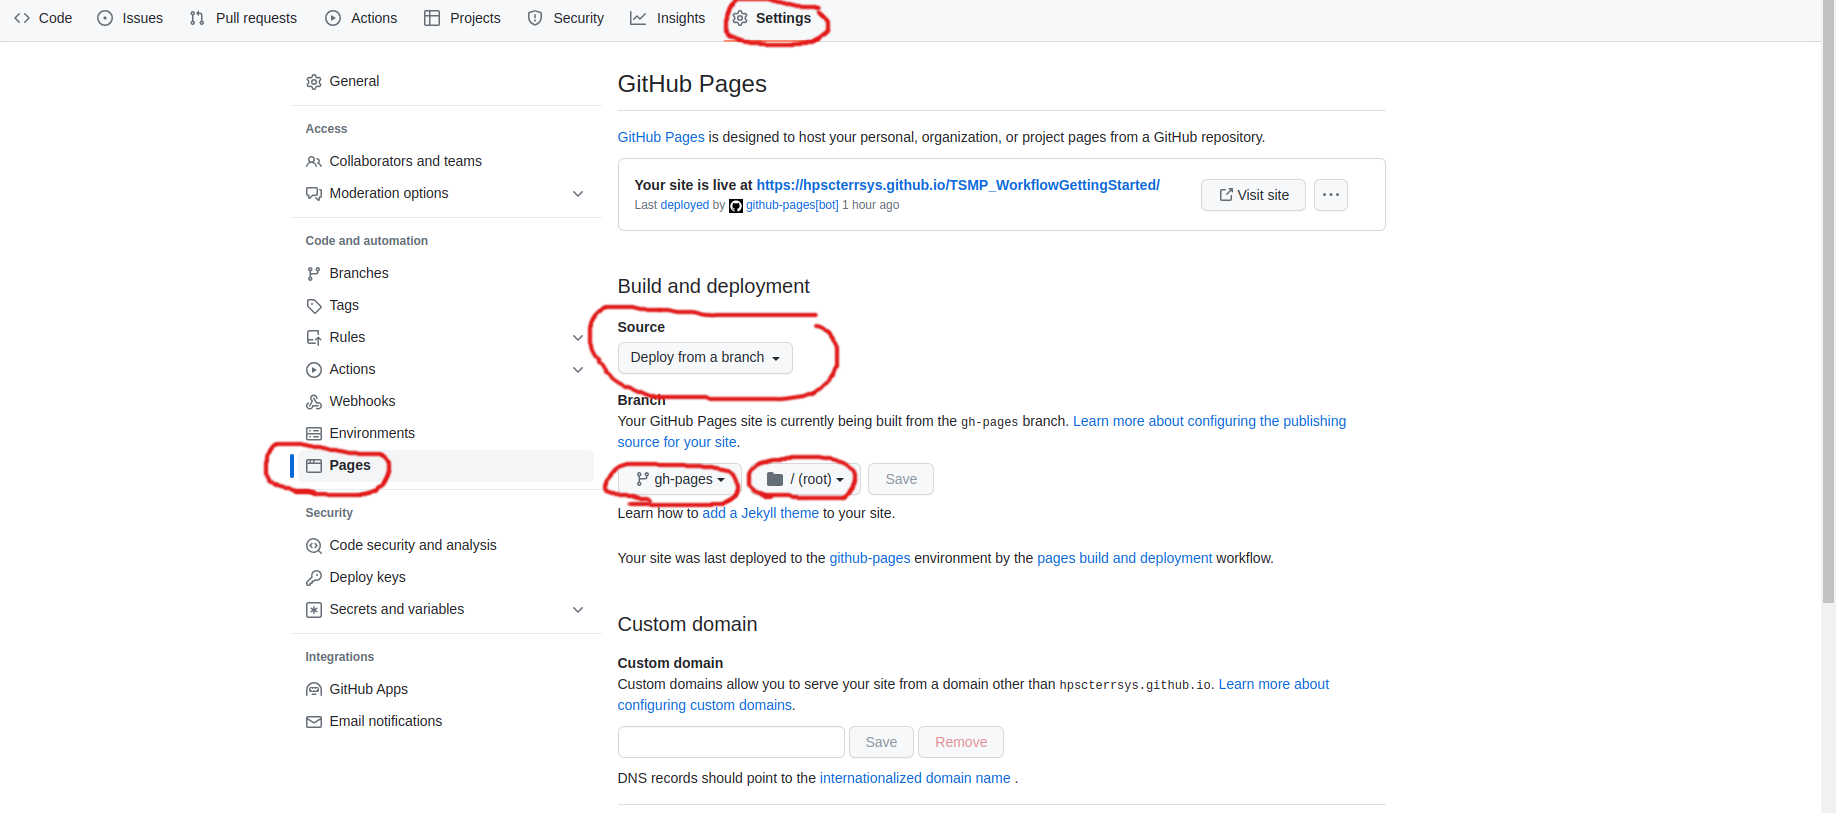
5.2. GitHub Pages
At their core, GitHub Pages are static websites hosted by GitHub and filled with content provided by a repository. With GitHub Pages, the user does not have to worry about the technicalities of hosting websites. All you need to do is provide the website content in a supported format. GitHub Pages are disabled by default, and must be enabled in the repository settings. GitHub pages are free, but require a public repository.
For this documentation, we have chosen to deploy the GitHub page from an extra branch, which means that we provide the content of the website from a separate branch of the relevant repository. If you look at the repository you will see that there are at least two branches. The main branch and a gh-pages branch. The gh-pages branch is automatically created when you enable GitHub Pages, and is a special form of a branch, because it does not contain any content from the repository itself. In our case, the gh-pages branch only contains the output of sphinx rendering, so the content of the website.
Rendering the website and filling the gh-pages branch is automated using GitHub workflows, which are explained in the following section GitHub workflows.
The following screenshot shows all the settings needed to enable GitHub pages:
5.3. GitHub workflows (CI/CD)
GitHub workflows are the functionality to execute a predefined set of programs in a defined order when a defined condition is met. These processing chains / workflows are defined in YAML files as a kind of abstract cookbook, e.g. saying
When event A is triggered, execute job B, which consists of steps C, D, and E.
These workflows can be as complex as you like by combining many and nested job-steps, which makes them very powerful! Each YAML file is a workflow, and you can have many workflows running in parallel with your repository, each for a different task. In order to be recognised as a workflow by GitHub, the YAML files must be saved under .github/workflows.
This repository contains three workflows, all aimed at rendering and deploying this documentation, but with slight differences depending on the triggering event.
Below is a annotated sample YAML file to get a quick feel for it:
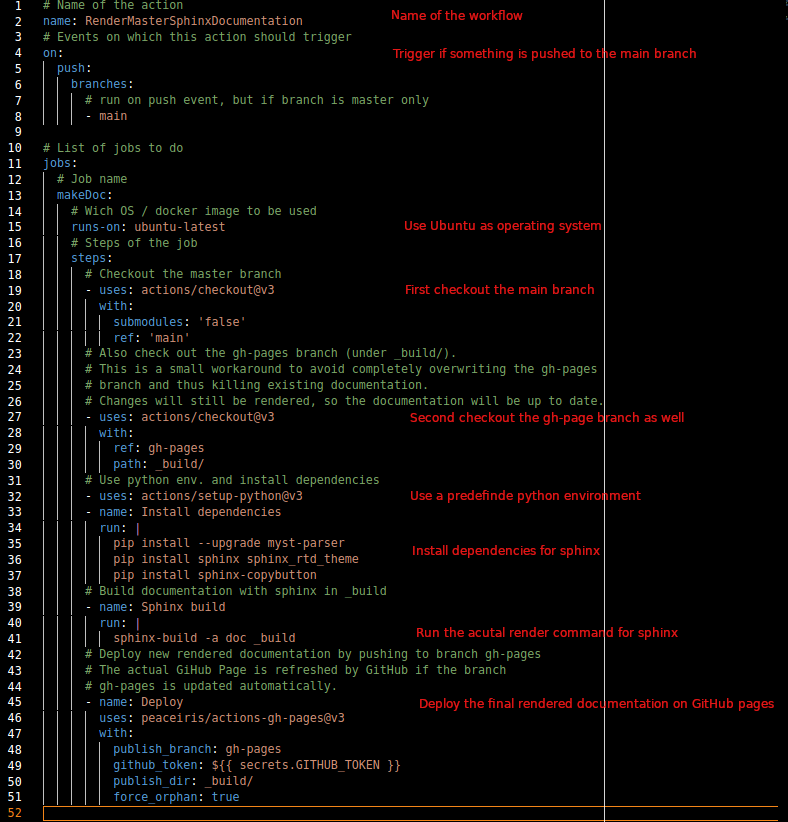
Again imagine this workflow as a cook-book, executed on a blank machine. So when the above workflow is triggered
A machine is started
Ubuntu is selected as the operating system
The content we want to render is checked out to this machine
The environment is set-up by using a pre-defined python environment and installing the necessary programs
The documentation is rendered using sphinx
The rendered documentation is deployed to the
gh-pagesbranch and published to the web.
As we chose Ubuntu as the operating system, we can run all available linux commands as job-steps, e.g. pip install --upgrade myst-parser, but also more complex predefined job-steps, e.g. uses: peaceiris/actions-gh-pages@v3, which is a kind of makro that combines a more complex task into a single command. There are many predefined makros available for GitHub workflows, which could be used for free
see GitHub-Marketplace.