Setting up eCLM#
Once you created a JSC account and have access to a compute time project, follow these steps which will guide you on how to download and build eCLM on a JSC system. This guide involves four major steps:
Prepare the environment
Download eCLM
Build eCLM
Loading dependencies
Configuring build settings
Building eCLM
Verify that eCLM works
Begin by logging in to the JSC system on your local machine using the ssh key. (Windows users: open a terminal with Putty)
For juwels for example do this:
ssh -X -i ~/.ssh/id_ed25519 user1@juwels.fz-juelich.de # replace user1 with your JuDoor username!
Step 1: Prepare the environment#
First, if not already done, you will create your own folders within the project1 and scratch directories of your compute project on the supercomputer.
# Check your projects and select a compute project with a non-empty 'budget-accounts'. Use it to replace projectID below!
jutil user projects -u $USER

# Activate your project
jutil env activate -p projectID

# Create folders
MYPROJECT="$PROJECT/$USER"
MYSCRATCH="$SCRATCH/$USER"
mkdir -p $MYPROJECT $MYSCRATCH
Step 2: Download eCLM#
Navigate to your $MYPROJECT directory and clone the eCLM repository from Github. Next you will navigate into the main model folder and set the eCLM_ROOT environment variable.
# Clone eCLM Github repository
cd $MYPROJECT
git clone https://github.com/HPSCTerrSys/eCLM.git

# Navigate into eCLM folder and export environment variable
cd eCLM
eCLM_ROOT=$(pwd)
Step 3: Build eCLM#
Loading dependencies#
Next, you need to load the software libraries required by eCLM. This is important as eCLM would fail to build nor run without knowing the location of its dependencies on the supercomputer. As this step needs to be done each time you start a new session, it is convenient to create a shell script that automates this step. Run this command to create a shell script named load-eclm-variables.sh in your $HOME directory:
cat << EOF > $HOME/load-eclm-variables.sh
Then copy the following in the shell file:
Attention
Before you copy, replace ‘projectID’ with your compute project!
#!/usr/bin/env bash

# Activate compute project
jutil env activate -p projectID

# Set helper variables
MYPROJECT=${MYPROJECT}
MYSCRATCH=${MYSCRATCH}
eCLM_ROOT=${eCLM_ROOT}

# Load eCLM dependencies
module load Stages/2024
module load Intel
module load ParaStationMPI
module load netCDF
module load netCDF-Fortran
module load PnetCDF
module load imkl
module load Python
module load Perl
module load CMake

# Display environment variables
module li
echo MYPROJECT=${MYPROJECT}
echo MYSCRATCH=${MYSCRATCH}
echo eCLM_ROOT=${eCLM_ROOT}

# Navigate into eCLM model folder
cd $eCLM_ROOT
EOF
Now, source the environment file by running:
source $HOME/load-eclm-variables.sh
You should get an output similar to this one:

Configuring build settings#
eCLM is built using the CMake build system. Initially, you need to pass some build settings to cmake, such as which C/Fortran compilers to be used and the location of the install folder. This is accomplished by running the following commands:
# Set variables
BUILD_DIR="${eCLM_ROOT}/build"
INSTALL_DIR="${eCLM_ROOT}/install"

# CMake configure step
cmake -S "${eCLM_ROOT}/src"                    \
      -B "${BUILD_DIR}"                        \
      -D CMAKE_INSTALL_PREFIX="${INSTALL_DIR}" \
      -D CMAKE_BUILD_TYPE="RELEASE"            \
      -D CMAKE_C_COMPILER=mpicc                \
      -D CMAKE_Fortran_COMPILER=mpifort
Building eCLM#
Finally, you can build eCLM. The commands below should take approximately 15-20 minutes to finish.
cmake --build "${BUILD_DIR}" && cmake --install "${BUILD_DIR}"
Step 4: Verify that eCLM works#
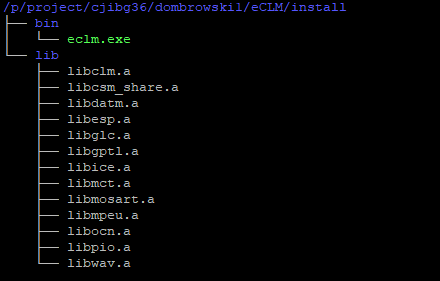
You can check if eCLM has been properly installed. The following command will display a directory tree showing the eCLM executable eclm.exe and library files in the lib directory:
tree $eCLM_ROOT/install
You should get something similar to:
Congratulations! You have successfully built and installed eCLM.